HTML5 Audio player with playlist
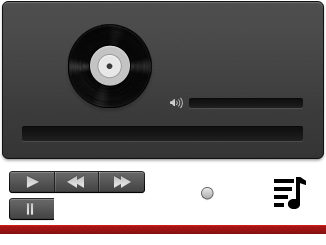
HTML5 audio player. Many of you faced with the task of creating audio player at least once in your life. Quite often , you simply choose one of the available players, often it was the flash player. However, you may have already noticed, that these flash players do not work properly on mobile devices (iPhone / Android). Today I am going to tell you about how to create your own audio player (using HTML5 technology). This player consists of next elements: title, author, cover, basic controls (play / pause, rewind / forward) , two sliders (jQuery UI sliders): volume slider and and a song tracker, and even more: we will also have a playlist with a list of available songs.
Live Demo
[sociallocker]
download the sources
[/sociallocker]
I believe that you already know how to create a simple audio player using a standard <audio> element. In our example, we will not use a special markup for this elemet, we will create our own player with all the necessary controls. We will control the player using the event handlers of a created (in JavaScript) audio element.
Step 1. HTML
As usual, we have to include several files in the head section:
<!DOCTYPE html>
<html lang="en">
<head>
    <meta charset="utf-8" />
    <meta name="author" content="Dev School" />
    <meta name="viewport" content="width=device-width, initial-scale=1.0, maximum-scale=1.0, user-scalable=0" />
    <title>HTML5 Audio player with playlist | Dev School</title>

    <!-- add styles and scripts -->
    <link href="css/styles.css" rel="stylesheet" type="text/css" />
    <script type="text/javascript" src="js/jquery-1.7.2.min.js"></script>
    <script type="text/javascript" src="js/jquery-ui-1.8.21.custom.min.js"></script>
    <script type="text/javascript" src="js/main.js"></script>
</head>
And now, please have a look at our player’s markup:
<div class="player">
    <div class="pl"></div>
    <div class="title"></div>
    <div class="artist"></div>
    <div class="cover"></div>
    <div class="controls">
        <div class="play"></div>
        <div class="pause"></div>
        <div class="rew"></div>
        <div class="fwd"></div>
    </div>
    <div class="volume"></div>
    <div class="tracker"></div>
</div>
<ul class="playlist hidden">
    <li audiourl="01.mp3" cover="cover1.jpg" artist="Artist 1">01.mp3</li>
    <li audiourl="02.mp3" cover="cover2.jpg" artist="Artist 2">02.mp3</li>
    <li audiourl="03.mp3" cover="cover3.jpg" artist="Artist 3">03.mp3</li>
    <li audiourl="04.mp3" cover="cover4.jpg" artist="Artist 4">04.mp3</li>
    <li audiourl="05.mp3" cover="cover5.jpg" artist="Artist 5">05.mp3</li>
    <li audiourl="06.mp3" cover="cover6.jpg" artist="Artist 6">06.mp3</li>
    <li audiourl="07.mp3" cover="cover7.jpg" artist="Artist 7">07.mp3</li>
</ul>
Looks easy, does not it? As you can see – all the necessary elements are included here.
Step 2. CSS
The time has come to turn our bare HTML model into a beautiful player, for that, we need to define the styles used for each element.
css/styles.css
.example {
    margin: 50px auto 0;
    width: 400px;
}
.player {
    background: transparent url("../images/spr.png") no-repeat scroll center top;
    height: 162px;
    position: relative;
    width: 326px;
    z-index: 2;
}
.title, .artist {
    font-family: verdana;
    left: 167px;
    position: absolute;

    -moz-user-select: none;
    -webkit-user-select: none;
    -ms-user-select: none;
}
.title {
    color: #FFFFFF;
    font-size: 14px;
    font-weight: bold;
    top: 23px;
}
.artist {
    color: #EEEEEE;
    font-size: 12px;
    top: 40px;
}
.pl {
    background: transparent url("../images/spr.png") no-repeat scroll -274px -175px;
    cursor: pointer;
    height: 34px;
    left: 270px;
    position: absolute;
    top: 20px;
    width: 32px;
}
.pl:hover {
    top: 21px;
}
.cover {
    background: transparent url(../data/cover1.jpg) no-repeat scroll center top;
    border-radius: 5px 5px 5px 5px;
    height: 94px;
    left: 20px;
    position: absolute;
    top: 20px;
    width: 94px;
}
.controls {
    cursor: pointer;
    height: 23px;
    left: 167px;
    position: absolute;
    top: 65px;
    width: 138px;
}
.controls .play, .controls .pause, .controls .rew, .controls .fwd {
    background: transparent url("../images/spr.png") no-repeat scroll 0 0;
    float: left;
    height: 100%;
    width: 33%;
}
.controls .play {
    background-position: -8px -171px;
}
.controls .pause {
    background-position: -8px -198px;
    display: none;
}
.controls .rew {
    background-position: -54px -171px;
}
.controls .fwd {
    background-position: -100px -171px;
}
.controls .play:hover {
    background-position: -8px -170px;
}
.controls .pause:hover {
    background-position: -8px -197px;
}
.controls .rew:hover {
    background-position: -54px -170px;
}
.controls .fwd:hover {
    background-position: -100px -170px;
}
.hidden {
    display: none;
}
.controls .visible {
    display: block;
}
.volume {
    height: 11px;
    left: 186px;
    position: absolute;
    top: 96px;
    width: 112px;
}
.tracker {
    height: 15px;
    left: 20px;
    position: absolute;
    top: 126px;
    width: 285px;
}
.ui-slider-range {
    background: transparent url("../images/spr.png") no-repeat scroll 5px -222px;
    height: 100%;
    position: absolute;
    top: 0;
}
.ui-slider-handle {
    cursor: pointer;
    height: 10px;
    margin-left: -5px;
    position: absolute;
    top: 2px;
    width: 10px;
    z-index: 2;
}
.volume .ui-slider-handle {
    background: url("../images/spr.png") no-repeat scroll -201px -188px rgba(0, 0, 0, 0);
    height: 13px;
    width: 13px;
}
.playlist {
    background-color: #333333;
    border-radius: 5px 5px 5px 5px;
    list-style-type: none;
    margin: -10px 0 0 2px;
    padding-bottom: 10px;
    padding-top: 15px;
    position: relative;
    width: 326px;
    z-index: 1;
}
.playlist li {
    color: #EEEEEE;
    cursor: pointer;
    margin: 0 0 5px 15px;
}
.playlist li.active {
    font-weight: bold;
}
Step 3. JavaScript
The beautiful player that does nothing – useless. To make it a true work of art, you have to fill it with events and functions. First at all, we need to initialize several variables:
js/main.js
    // inner variables
    var song;
    var tracker = $('.tracker');
    var volume = $('.volume');

    // initialization - first element in playlist
    initAudio($('.playlist li:first-child'));

    // set volume
    song.volume = 0.8;

    // initialize the volume slider
    volume.slider({
        range: 'min',
        min: 1,
        max: 100,
        value: 80,
        start: function(event,ui) {},
        slide: function(event, ui) {
            song.volume = ui.value / 100;
        },
        stop: function(event,ui) {},
    });

    // empty tracker slider
    tracker.slider({
        range: 'min',
        min: 0, max: 10,
        start: function(event,ui) {},
        slide: function(event, ui) {
            song.currentTime = ui.value;
        },
        stop: function(event,ui) {}
    });
Then, I prepared several general functions to handle with audio:
    function initAudio(elem) {
        var url = elem.attr('audiourl');
        var title = elem.text();
        var cover = elem.attr('cover');
        var artist = elem.attr('artist');

        $('.player .title').text(title);
        $('.player .artist').text(artist);
        $('.player .cover').css('background-image','url(data/' + cover+')');;

        song = new Audio('data/' + url);

        // timeupdate event listener
        song.addEventListener('timeupdate',function (){
            var curtime = parseInt(song.currentTime, 10);
            tracker.slider('value', curtime);
        });

        $('.playlist li').removeClass('active');
        elem.addClass('active');
    }
    function playAudio() {
        song.play();

        tracker.slider("option", "max", song.duration);

        $('.play').addClass('hidden');
        $('.pause').addClass('visible');
    }
    function stopAudio() {
        song.pause();

        $('.play').removeClass('hidden');
        $('.pause').removeClass('visible');
    }
And then I started to add event handlers to our control buttons. Play / Pause buttons:
    // play click
    $('.play').click(function (e) {
        e.preventDefault();

        playAudio();
    });

    // pause click
    $('.pause').click(function (e) {
        e.preventDefault();

        stopAudio();
    });
In order to turn to another song in the playlist, we have to stop playing a current song, pick a next (or previous) object in the playlist, and re-initialize our Audio element. Forward / Rewind buttons:
    // forward click
    $('.fwd').click(function (e) {
        e.preventDefault();

        stopAudio();

        var next = $('.playlist li.active').next();
        if (next.length == 0) {
            next = $('.playlist li:first-child');
        }
        initAudio(next);
    });

    // rewind click
    $('.rew').click(function (e) {
        e.preventDefault();

        stopAudio();

        var prev = $('.playlist li.active').prev();
        if (prev.length == 0) {
            prev = $('.playlist li:last-child');
        }
        initAudio(prev);
    });
Finally, few functions to handle with the playlist:
    // show playlist
    $('.pl').click(function (e) {
        e.preventDefault();

        $('.playlist').fadeIn(300);
    });

    // playlist elements - click
    $('.playlist li').click(function () {
        stopAudio();
        initAudio($(this));
    });
Step 4. Images
All used images are packed into one single sprite file: nav.png

Live Demo
Conclusion
That’s all for today, we have just prepared glorious audio player. Thanks for your patient attention, and if you really like what we done today – share it with all your friends in your social networks using the form below.

