
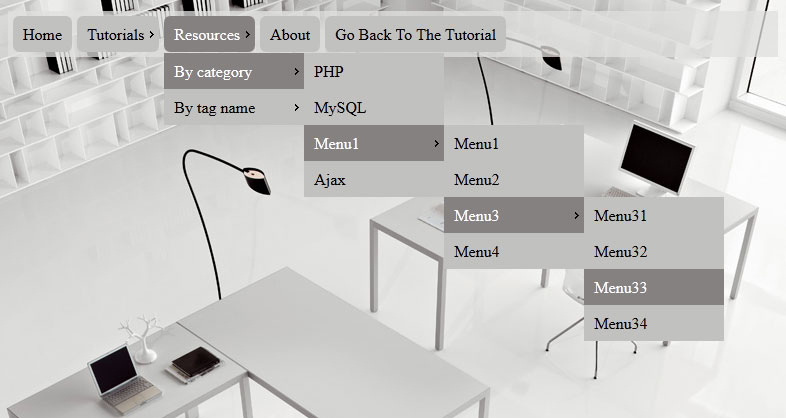
Multi-level CSS3 dropdown menu tutorial. Nowadays, pure CSS3 menus still very popular. Mostly – this is UL-LI based menus. Today we will continue making nice menus for you. This will multilevel dropdown menu, but today submenus will appear not onhover, but onclick action.
Here are final result (what we will creating):
Here are samples and downloadable package:
Live Demo
[sociallocker]
download in package
[/sociallocker]
Ok, download the example files and lets start coding !
Step 1. HTML
As usual, we start with the HTML.
Here are full html code with our menu. As you can see – this is multi-level menu. I hope that you can easy to understand it. Whole menu built on UL-LI elements.
index.html
<link rel="stylesheet" href="css/style.css" type="text/css" media="screen">

<div class="example">
    <ul id="nav">
        <li><a href="https://dev-school.net/">Home</a></li>
        <li><a class="fly" href="#" tabindex="1">Tutorials</a>
            <ul class="dd">
                <li><a href="https://dev-school.net/category/html-css/">HTML / CSS</a></li>
                <li><a class="fly" href="#" tabindex="1">JS / jQuery</a>
                    <ul>
                        <li><a href="https://dev-school.net/category/jquery/">jQuery</a></li>
                        <li><a href="https://dev-school.net/category/javascript/">JS</a></li>
                    </ul>
                </li>
                <li><a href="https://dev-school.net/category/php/">PHP</a></li>
                <li><a href="https://dev-school.net/category/mysql/">MySQL</a></li>
                <li><a href="https://dev-school.net/category/xslt/">XSLT</a></li>
                <li><a href="https://dev-school.net/category/ajax/">Ajax</a></li>
            </ul>
        </li>
        <li><a class="fly" href="#" tabindex="1">Resources</a>
            <ul class="dd">
                <li><a class="fly" href="#" tabindex="1">By category</a>
                    <ul>
                        <li><a href="https://dev-school.net/category/php/">PHP</a></li>
                        <li><a href="https://dev-school.net/category/mysql/">MySQL</a></li>
                        <li><a class="fly" href="#" tabindex="1">Menu1</a>
                            <ul>
                                <li><a href="#">Menu1</a></li>
                                <li><a href="#">Menu2</a></li>
                                <li><a class="fly" href="#" tabindex="1">Menu3</a>
                                    <ul>
                                        <li><a href="#">Menu31</a></li>
                                        <li><a href="#">Menu32</a></li>
                                        <li><a href="#">Menu33</a></li>
                                        <li><a href="#">Menu34</a></li>
                                    </ul>
                                </li>
                                <li><a href="#">Menu4</a></li>
                            </ul>
                        </li>
                        <li><a href="https://dev-school.net/category/ajax/">Ajax</a></li>
                    </ul>
                </li>
                <li><a class="fly" href="#" tabindex="1">By tag name</a>
                    <ul>
                        <li><a href="https://dev-school.net/tag/captcha/">captcha</a></li>
                        <li><a href="https://dev-school.net/tag/gallery/">gallery</a></li>
                        <li><a href="https://dev-school.net/tag/animation/">animation</a></li>
                    </ul>
                </li>
            </ul>
        </li>
        <li><a href="https://dev-school.net/about/">About</a></li>
        <li><a href="https://dev-school.net/click-action-multilevel-css3-dropdown-menu/">Go Back To The Tutorial</a></li>
    </ul>
</div>
Step 2. CSS
Here are used CSS styles. First two selectors – layout of our demo page. All rest – belong to menu.
css/style.css
/* demo page styles */
body {
    background:#eee;
    margin:0;
    padding:0;
}
.example {
    background:#fff url(../images/tech.jpg);
    width:770px;
    height:570px;
    border:1px #000 solid;
    margin:20px auto;
    padding:15px;
    border-radius:3px;
    -moz-border-radius:3px;
    -webkit-border-radius:3px;
}


/* main menu styles */
#nav,#nav ul {
    background-image:url(../images/tr75.png);
    list-style:none;
    margin:0;
    padding:0;
}
#nav {
    height:41px;
    padding-left:5px;
    padding-top:5px;
    position:relative;
    z-index:2;
}
#nav ul {
    left:-9999px;
    position:absolute;
    top:37px;
    width:auto;
}
#nav ul ul {
    left:-9999px;
    position:absolute;
    top:0;
    width:auto;
}
#nav li {
    float:left;
    margin-right:5px;
    position:relative;
}
#nav li a {
    background:#c1c1bf;
    color:#000;
    display:block;
    float:left;
    font-size:16px;
    padding:8px 10px;
    text-decoration:none;
}
#nav > li > a {
    -moz-border-radius:6px;
    -webkit-border-radius:6px;
    -o-border-radius:6px;
    border-radius:6px;

    overflow:hidden;
}
#nav li a.fly {
    background:#c1c1bf url(../images/arrow.gif) no-repeat right center;
    padding-right:15px;
}
#nav ul li {
    margin:0;
}
#nav ul li a {
    width:120px;
}
#nav ul li a.fly {
    padding-right:10px;
}

/*hover styles*/
#nav li:hover > a {
    background-color:#858180;
    color:#fff;
}

/*focus styles*/
    #nav li a:focus {
    outline-width:0;
}

/*popups*/
#nav li a:active + ul.dd,#nav li a:focus + ul.dd,#nav li ul.dd:hover {
    left:0;
}
#nav ul.dd li a:active + ul,#nav ul.dd li a:focus + ul,#nav ul.dd li ul:hover {
    left:140px;
}
Step 3. Images
Our menu using only three images: arrow.gif, tech.jpg and tr75.png. I don`t included them into tutorial, just because two of them very small (will difficult to locate it) and last one – just background image. All images will in package.
Live Demo
Conclusion
Hope you enjoyed with this tutorial, don’t forget to tell thanks and leave a comment 🙂 Good luck!