
How to get your Google+ profile info and friend’s activity using the Google JS API
Today I would like to tell you about several interesting things. It is Google JavaScript API v3 and new generation of jQuery Templates – JsRender. I will show you how to setup authentication with Google (OAuth 2.0) and perform some API requests. One of them is obtaining info of logged-in member, and second one is obtaining an activity feed of your friends. Another side of our tutorial is jQuery templating. I will show you how to render HTML content using templates.
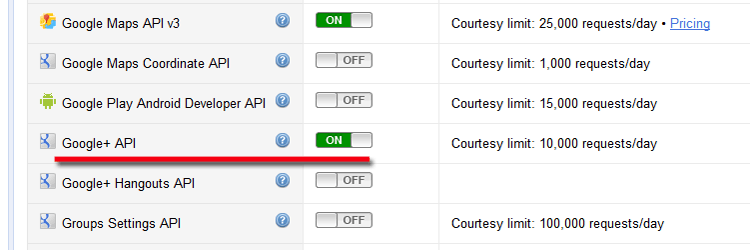
I hope that you’ve already created your own API project in the Google APIs Console as I’ve described recently in my Google API – Get contact list tutorial. If you haven’t – please do it and create your own Google API project. Next step is enabling of ‘Google+ API’, so, please open your Google API console and then select ‘Services’. Here we should Enable ‘Google+ API’:
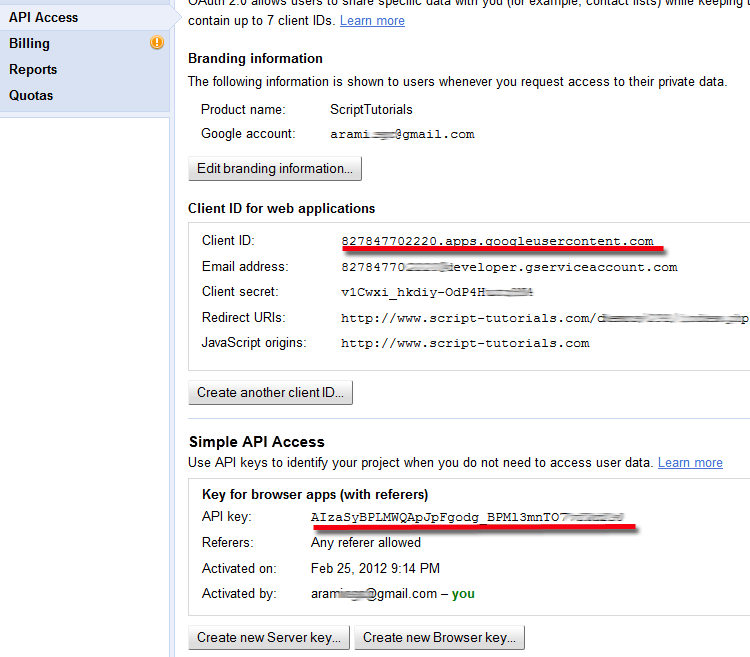
After, please open ‘API Access’ and copy your ‘Client ID’ and ‘API key’ (at the end) keys:
Now we are ready to start coding !
Live Demo
[sociallocker]
download in package
[/sociallocker]
Step 1. HTML
Right now create an empty index.html file and put next code:
index.html
<!DOCTYPE html>
<html lang="en" >
<head>
    <meta charset="utf-8" />
    <title>How to get your Google+ profile info and friend's activity using the Google JS API | Dev School</title>
    <link href="css/main.css" rel="stylesheet" type="text/css" />

    <script type="text/javascript" src="https://www.google.com/jsapi"></script>
    <script>
        google.load("jquery", "1.7.1");
    </script>
    <script type="text/javascript" src="js/jsrender.js"></script>

    <!-- define template for our units -->
    <script id="gplusTemplate" type="text/x-jsrender">
        <div id="{{>id}}" class="gp">
            <img src="{{:actor.image.url}}" />
            <div>
                <p><a href="{{:actor.url}}" target="_blank">{{:actor.displayName}}</a><span>{{:published}}</span></p>
                <p><a href="{{:url}}" target="_blank">{{:title}}</a></p>
                <p>{{:object.content}}</p>
            </div>
        </div>
    </script>
</head>
<body>
    <header>
        <h2>How to get your Google+ profile info and friend's activity using the Google JS API</h2>
        <a href="https://dev-school.net/google-javascript-api-practice-with-jquery-templates/" class="stuts">Back to original tutorial on <span>Dev School</span></a>
    </header>
    <img src="google-plus.jpg" class="google" alt="google plus" />

    <center>
        <button id="login" style="visibility: hidden">Authorize</button>
        <div id="author"></div>
        <div id="actList"></div>
    </center>

    <script type="text/javascript">
        // Your client ID
        var clientId = 'YOUR_CLIENT_ID_KEY';

        // Your API key
        var apiKey = 'YOUR_API_KEY';

        // The authorization scope
        var scopes = 'https://www.googleapis.com/auth/plus.me';

        // onliad initialization
        function onloadInitialization() {
            // set our own api key
            gapi.client.setApiKey(apiKey);

            // and checkAuth in 1 ms
            window.setTimeout(checkAuth, 1);
        }

        // check authorization
        function checkAuth() {
            gapi.auth.authorize({
                client_id: clientId,
                scope: scopes,
                immediate: true
            }, handleAuthResult);
        }

        // handle authorization result
        function handleAuthResult(authResult) {
            var authorizeButton = document.getElementById('login');
            if (authResult && ! authResult.error) {
                authorizeButton.style.visibility = 'hidden';
                makeGoogleApiCalls();
            } else {
                authorizeButton.style.visibility = '';
                authorizeButton.onclick = handleAuthClick;
            }
        }

        // handle onclick event of Login button
        function handleAuthClick(event) {
            gapi.auth.authorize({
                client_id: clientId,
                scope: scopes,
                immediate: false
            }, handleAuthResult);

            return false;
        }

        // make Google API calls: obtain logged-in member info and activity of friends
        function makeGoogleApiCalls() {
            gapi.client.load('plus', 'v1', function() {

                // Request1: obtain logged-in member info
                var request = gapi.client.plus.people.get({
                    'userId': 'me'
                });
                request.execute(function(aInfo) {

                    // prepare author info array for rendering
                    var authorInfo = [
                        {
                            'id': aInfo.id,
                            'actor': {'image': {'url': aInfo.image.url}, 'url': aInfo.url, 'displayName': aInfo.displayName},
                            'published': '',
                            'url': aInfo.url,
                            'title': 'My page at G+',
                            'object': {'content': ''}
                        }
                    ];
                    // and render it using 'gplusTemplate' template
                    $('#author').html(
                        $('#gplusTemplate').render(authorInfo)
                    );
                });

                // Request2: obtain friend's activity feed
                var restRequest = gapi.client.request({
                    'path': '/plus/v1/activities',
                    'params': {'query': 'Google+', 'orderBy': 'best'}
                });
                restRequest.execute(function(activityInfo) {

                    // render activity items using 'gplusTemplate' template
                    $('#actList').html(
                        $('#gplusTemplate').render(activityInfo.items)
                    );
                });
            });
        }
    </script>
    <script src="https://apis.google.com/js/client.js?onload=onloadInitialization"></script>
</body>
</html>
In the header of our file we load jQuery library, jsrender.js (JsRender library) and define custom HTML template (gplusTemplate). We will use this template to generate G+ friend’s activity list.
In the body of our page we have ‘Authorize’ button and 2 containers (to display our own info and activity list:
<button id="login" style="visibility: hidden">Authorize</button>
<div id="author"></div>
<div id="actList"></div>
Now we should understand our JS code. Important note – please put your own ClientID and API keys in the beginning of this JavaScript code. Several functions in the middle are for handling with Login button (authorization). When the page has loaded we set API key and set timeout to check authorization. If we are logged in – we hide Login button. Otherwise – display it and add ‘onclick’ handler (to evoke authorization). The standard authorize() method always shows a popup window, which can be a little annoying if you are just trying to refresh an OAuth 2.0 token. Google’s OAuth 2.0 implementation also supports “immediate” mode, which refreshes a token without a popup window.
Well, when we are logged in – we can make Google API calls. We are going to make 2 api requests: get member info and get friends activity. This is very easy:
Well, when we are logged in – we can make Google API calls. We are going to make 2 api requests: get member info and get friends activity. This is very easy:
// Request1: obtain logged-in member info
var request = gapi.client.plus.people.get({
    'userId': 'me'
});
request.execute(function(aInfo) {
    // do something else
});

// Request2: obtain friend's activity feed
var restRequest = gapi.client.request({
    'path': '/plus/v1/activities',
    'params': {'query': 'Google+', 'orderBy': 'best'}
});
restRequest.execute(function(activityInfo) {
    // do something else
});
Next part is very interesting too. As you can see – as usual we get response in JSON format. Thus I have a question – how to use data from JSON response in order to generate result HTML code? Some people can offer ‘for’ method (to pass through all the elements of the JSON array), but I would like you to suggest a new method – templates. It has one important advantage – speed. The result speed can be very high especially during generation of big lists. Look at this code and you will understand that this is very easy to render html content using JsRender library:
var restRequest = gapi.client.request({
    'path': '/plus/v1/activities',
    'params': {'query': 'Google+', 'orderBy': 'best'}
});
restRequest.execute(function(activityInfo) {

    // render activity items using 'gplusTemplate' template
    $('#actList').html(
        $('#gplusTemplate').render(activityInfo.items)
    );
});
You can download JsRender jQuery library here. JsRender templates Syntax:
| Description | Example | Output |
| Value of firstName property of the data item with no encoding | {{:firstName}} | Madelyn |
| Simple object path to nested property, with no encoding | {{:movie.releaseYear}} | 1987 |
| Simple comparison | {{:movie.releaseYear < 2000}} | true |
| Value with no encoding | {{:movie.name}} | Star Wars IV: Return of the Jedi |
| HTML-encoded value | {{>movie.name}} | Star Wars: Episode VI: <span style=’color:purple;font-style: italic;’>Return of the Jedi</span> |
| HTML-encoded value | {{html:movie.name}} | Star Wars: Episode VI: <span style=’color:purple;font-style: italic;’>Return of the Jedi</span> |
Live Demo
Conclusion
If you have any suggestions about further ideas for articles – you are welcome to share them with us. Good luck in your work!